Triển khai PXE sử dụng Cobbler Server và cấu hình DHCP server trên Pfsense – Deploy OS Linux
30/08/2020 23:40 | Luợt xem : 104
Mục lục
1. PXE là gì?
PXE – Preboot Execution Environment, môi trường thực thi preboot. PXE là một cơ chế cho phép khởi động một phần mềm lấy qua mạng (hệ điều hành).
Về khái niệm cụ thể, có chế hoạt động và mô hình của PXE các bạn có thể tham khảo chi tiết trong một bài viết khác của BKNS tại đây
Bài này mình sẽ giới thiệu với các bạn về các bước cài đặt Cobbler Server và Deploy OS Linux (Centos, Ubuntu).
Yêu cầu chuẩn bị cho triển khai:
- Hệ điều hành Centos 7 cài đặt Cobbler Server.
- DHCP Server: Sử dụng Pfsense để cấp DHCP
- TFTP Server: Sử dụng Cobbler Server
2. Cài đặt Cobbler Server.
- Update OS:
# yum install wget tar gcc gcc-c++ flex bison make bind bind-libs bind-utils openssl openssl-devel perl quota libaio libcom_err-devel libcurl-devel gd zlib-devel zip unzip libcap-devel cronie bzip2 cyrus-sasl-devel perl-ExtUtils-Embed autoconf automake libtool which patch mailx bzip2-devel lsof glibc-headers kernel-devel expat-devel psmisc net-tools systemd-devel libdb-devel perl-DBI perl-Perl4-CoreLibs perl-libwww-perl xfsprogs rsyslog logrotate crontabs file kernel-headers
# yum install epel-release –y
# yum update -y
- Cài đặt đồng bộ thời gian
# yum install chrony -y
# systemctl start chronyd
# systemctl enable chronyd
# systemctl restart chronyd
# chronyc sources -v
- Cài đặt Cobbler Server và các gói phụ
# yum install cobbler cobbler-web syslinux xinetd bind bind-utils debmirror pykickstart fence-agents-all –y
# systemctl start cobblerd
# systemctl enable cobblerd
# systemctl start httpd
# systemctl enable httpd
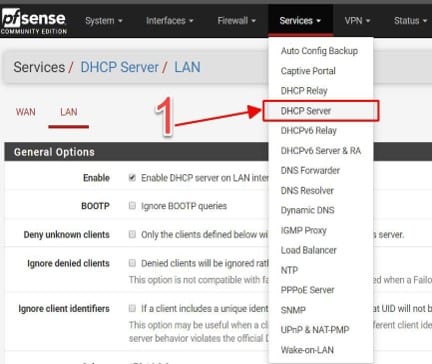
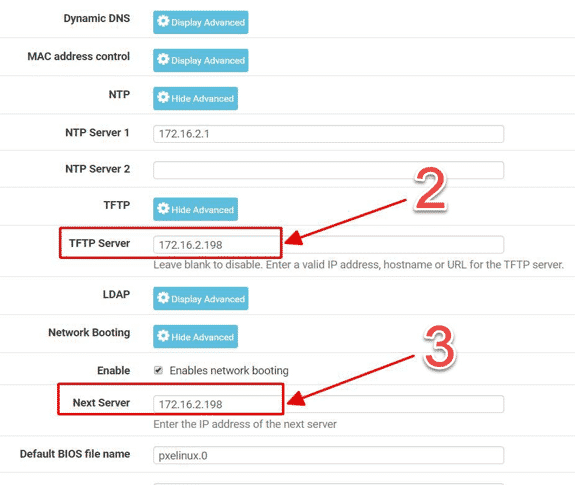
- Cấu hình DHCP Server trên Pfsense
Bài này mình sẽ chỉ sử dụng 1 IP chính của Cobbler Server để cấu hình cho DHCP Server trên Pfsense và cũng đóng vai trò là TFTP Server.
- Sửa file cấu hình Cobbler các giá trị:
# vi /etc/cobbler/settings
manage_dns: 1
bind_master: 8.8.8.8
next_server: 172.16.2.198 (IP TFTP Server)
server: 172.16.2.198 (IP Cobbler Server)
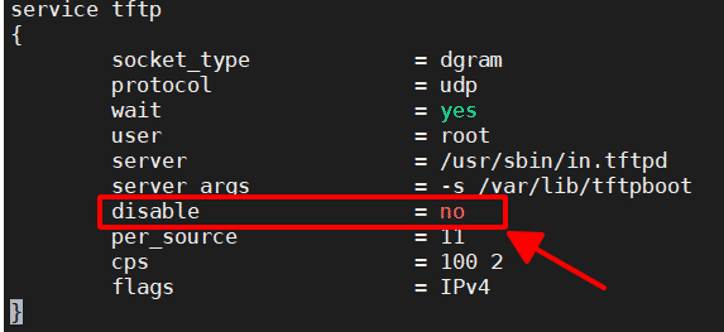
# vi /etc/xinetd.d/tftp
# vi /etc/debmirror.conf
Disbale @dists=”sid”; và @arches=”i386″; để hỗ trợ các distro Debian.
#@dists="sid";
#@arches="i386";
- Khởi động lại services
# systemctl enable rsyncd.service
# systemctl restart rsyncd.service
# systemctl restart cobblerd
# systemctl restart xinetd
# systemctl enable xinetd
# cobbler get-loaders
# cobbler check
# cobbler sync
3. Deploy OS Linux
a. Deploy OS CentOS 6-7-8
Phần này là các bước deploy OS Centos 7, với OS Centos 6 và Centos 8 các bạn có thể làm các bước tương tự để deploy OS.
# cd /var/lib/tftpboot/
# mkdir CentOS-7
# cd /var/lib/tftpboot/CentOS-7
# wget https://mirrors.bkns.vn/centos/7/os/x86_64/isolinux/vmlinuz
# wget https://mirrors.bkns.vn/centos/7/os/x86_64/isolinux/initrd.img
Chỉnh sửa cấu hình Menu Boot:
# vi /var/lib/tftpboot/pxelinux.cfg/default
Thêm nội dung sau:
label 1

menu label Install CentOS-7-x64 with http://mirror.bkns.vn Repo

kernel CentOS-7/vmlinuz

append initrd=CentOS-7/initrd.img
method=https://mirrors.bkns.vn/centos/7/os/x86_64/
b. Deploy OS Ubuntu 16-18-20
Phần này là các bước deploy Ubuntu 16, với Ubuntu 18 và Ubuntu 20 các bạn cũng làm các bước tương tự nhé. Với OS Centos 7 phía trên thì dữ liệu của OS sẽ được download từ trên https://mirrors.bkns.vn về để tiến hành cài đặt. Còn với OS Ubuntu này mình sẽ tiến hành Upload và giải nén dữ liệu OS lưu trữ trên Cobber Server – Có nghĩa là lúc này Cobbler Server sẽ đóng vai trò giống như TFTP Server bạn nhé.
Upload hoặc download ISO (trong bài này đã upload 3 iso trong thư mục /home)
# mkdir /mnt/Ubuntu-16
# mkdir /var/www/html/ubuntu16/
# mount -t iso9660 -o loop /home/ubuntu-16.04.6-server-amd64.iso /mnt/Ubuntu-16/
# cp -r /mnt/Ubuntu-16/* /var/www/html/ubuntu16/
Tạo file local-sources.seed
# cd /var/www/html/ubuntu16/preseed/
# touch local-sources.seed
# vi local-sources.seed
Add:
d-i live-installer/net-image string http://172.16.2.198/ubuntu16/install/filesystem.squashfs
Download Kernel từ TFTP Server lưu trữ phía trên.
# cd /var/lib/tftpboot/
# mkdir Ubuntu-16
# cd /var/lib/tftpboot/Ubuntu-16
# wget http://172.16.2.198/ubuntu16/install/netboot/ubuntu-installer/amd64/initrd.gz
# wget http://172.16.2.198/ubuntu16/install/netboot/ubuntu-installer/amd64/linux
Chỉnh sửa cấu hình Menu Boot:
# vi /var/lib/tftpboot/pxelinux.cfg/default
Thêm nội dung sau:
label 2

menu label Install Ubuntu-16-x64 with Local

kernel Ubuntu-16/linux

append url=http://172.16.2.198/ubuntu16/preseed/local-sources.seed vga=788 initrd=Ubuntu-16/initrd.gz
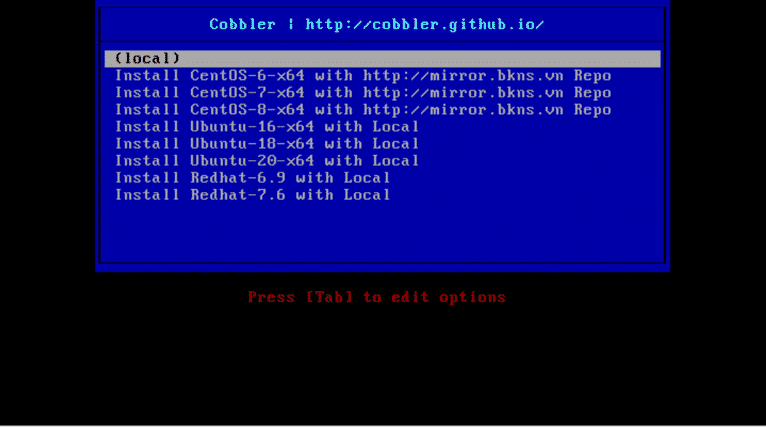
Sau khi tạo xong PXE boot sử dụng Cobbler Server, thì các máy Client trong mạng khi khởi động boot PXE sẽ hiển thị được menu boot như hình dưới.
Chúc các bạn thành công!
Hào Phạm – Bộ phận kỹ thuật!


